Slider

DIY Time: Wall Art 1

Tuesday, December 13, 2011

Ok so I have some fun posts coming up with some DIY projects I have completed!

The first project I wanted to show you was to create some nice wall art for above my bed.

SO...I had these three frames that I bought from a thrift store a long time ago. They probably cost me about a $1 each and I have been wondering what I should do with them.

 The first frame, I had was really big and I made a little clothesline on the frame to hang some engagement pictures of me and my husband.


I can't for the life of me, figure out how to rotate this picture...so just turn your head sideways...and if you know how, leave me a comment on how to fix it! 

Anyway...this project was really easy to complete.

Materials needed: staple gun, fishing line, clothes pins, empty frame.

Since I did this frame over a year ago, I have no pictures!....but the process is really easy.

Staple the fishing line to the back of the frame, hang pictures with clothespins! DONE :)  

I am changing the colors of our bedroom to chocolate brown and burnt orange, so I spray-painted the clothes pins burnt orange :)


That completes the first picture in my three picture piece :) 


Stay tuned for the next ones!

-Megan

Happy Birthday! I'm Pregnant!

Wednesday, November 9, 2011

My best birthday present this birthday is finding out I'm pregnant!

Well...technically I found out on October 30, so it was really like an early birthday present.

My husband and I didn't plan this precious gift, but it is a delightful surprise :)


I took two tests just to make sure! 


Nervous & Excited!


We decided to keep it a secret until we had an ultrasound just to make sure the tests weren't wrong.


Yep, there's a baby in there! That little black dot is the "egg sac" that our baby will begin to grow in! 
It's actually already growing, it's just too small to see.  I'm only 5 weeks...well 6 weeks now :)


My first belly bump picture...there's nothing showing yet!

This is probably not going to turn into a mommy blog...but you can expect some updates here and there :)

-Megan 

Where My Calling Began....

Saturday, October 29, 2011

I wanted to share with you all how my passion for inner-city ministry got started. I wrote the following story, essay, letter...whatever you want to call it when I finished a summer mission trip called the Fresno Urban Internship. It was a summer that changed my life. There will also be some awesome pictures from that time in my life :)

The whole gang...my family for the summer :)


How was my summer?

            Amazing. Life-changing. Eye-opening. Heart-breaking. Frustrating. Revealing. Challenging. Uncomfortable. Perfect. Imperfect. Lovely. I saw truth. I caught a glimpse of what life could be like if we all decided to listen to that still small voice, to actually do what the Word says. I got a snapshot of what God’s Kingdom is like. Living in community, sharing food/cars/..even beds. Sharing space and sharing our lives. Listening to each other and praying for one another, sharing the Word, impromptu worship, deep convos.  Investing time in one another and in the people of the city.


Process Group...people who helped me figure out & understand everything 
learning. 


           I learned that loving my neighbor IS loving God. When someone asked Jesus what the most important commandment is, he says Love God and Love your neighbor as yourself. That command is ONE command, not two separate ones. Once you love your neighbor, it seems like your faith becomes more complete because you are actually doing what God says. I’ve come to realize that as Christians we are called to be in love with everybody. Love should saturate everything we do. Even when it’s hard or inconvenient, we have to love. It’s by our love that people will notice a difference in us and wonder what motivates us to love the way we do.


The Pink House! Learn more here.


        I lived on $35 a week for food and gas, I got my cell phone once a week for three hours, I had no computer….No Myspace. Surprisingly that wasn’t an inconvenience; it gave me a freedom that I never felt before. I think that the more stuff you have the more you seem to worry. I also think greater bonds were forged without all the stuff.  I walked everywhere which gave me the chance to talk to my neighbors every morning. I worked with amazing kids who broke my heart and made me fall in love with them. Something inside me just melted when they would be excited to see me and give me hugs. Sometimes they frustrated me and made me want to give up. A friend told me that when it reaches that point, that is when it is most crucial for the Kingdom.


Awesome kids I worked with at Youth for Christ


            I learned even though I may be a messed up, imperfect person God uses that to reach out to certain people. All my experiences, my pain, my wounds, my joy, my triumph has molded me into a person that makes me able to serve God. I saw that I have past wounds that still need healing and as God heals them, it will bring healing to others as well. My past has prepared me for the future and God will use it for His glory. “And I am humbled to see that out of the twistedness of my wounds, he designs for me a special place of service” (There is the Kingdom). God has made me the way I am for a reason. I have to embrace that and realize that I am a person worth being cherished. “I am fearfully and wonderfully made” (Psalm 139:14). I deserve to be treated well. I learned that I have a voice. I learned that I need to take a stand for myself and for what is right. There’s no more riding the fence and no more accepting the mediocre. No more being a door mat and letting people walk all over me or rope me into things. I have a voice and something worth saying.

The Keeler Girls :) my awesome roommates! 


             I learned that I have been color-blind my whole life, that everything that I’ve been taught about race has been skewed. It’s really ok to notice that people are different from each other. We’re not all the same. We are all human beings and God got pretty creative when he made each one of us. I think that God relishes in the differences between us. I saw that racism is still prevalent in the city and in the systems of society. Just a thought from my notes: “Racism is the denial that all people were created in the image of God.” Saying that one race is better than the other is in direct contradiction to the Word of God. “So God created man in his own image, in the image of God he created him; male and female he created them” (Genesis 1:27).  Through learning about race and racism, I am on a journey to find out what it means to be white. What is my culture? What does it mean to be a Norwegian American? I wonder if I’ll ever know since nothing has ever been passed down from generation to generation.

The City :)


            I learned the truth about immigration. It’s ugly. It’s unfair. There’s no justice. People die trying to cross the border just so they can work like a slave. They get the jobs that no one else wants and do not even receive fair compensation. Sometimes, they might not even get paid for all of their work. Immigrants don’t just come here to steal American’s jobs or take their health care. They come here because there are no jobs in Mexico that can support their families. Coming to America is their last resort. So many people are ignorant about this issue, I was too before FUI. Now, I want the world to know the truth.

I met my hubby that summer. I'm in the gray(oh so attractive!) and he's in the red shirt. 


           FUI rocked my world, flipped it upside down, and I can never live the same. Living in community and literally loving my neighbor just felt so right. While I was there, I just felt like this is how life should be. Even though it wasn’t always easy or enjoyable, it was so worth it. While I can try to explain my experience, it will only just be skimming the surface.  It can only be fully explained in the way that I live my life from now on.

Oh P.S. FUI stands for the Fresno Urban Internship, which was the internship I did this summer in downtown Fresno.

I hope you enjoyed this long look into my calling...but I felt it appropriate to share since this is where it all started and where I come back to whenever I need motivation :)

-Megan :)


The Rest of the Spreading Kindness Tips

Wednesday, October 26, 2011

Is it bad that I got bored of posting about the same thing every day??...even though it was about kindness?

Maybe.

Well...it can be remedied! I decided to list the rest of the ways to spread kindness and be done with it today, yay!

15. Support the local economy and go eat at a Mom & Pop shop
16. Be aware of global issues and see what you can do about it..example: human trafficking
17. Only say positive things for one ENTIRE day
18. When driving let the other driver go first, give them a nice wave too!
19. Do an extra task at work for the person on the shift after you
20. Offer to babysit for free so a couple can have a date night
21. Sponsor a child...World Vision, Compassion
22. Adopt-a-Solider
23. Let someone with fewer items go in front of you at the grocery store

I'll admit that at this point my creativity was waning so I Googled "ways to spread kindness" and I found this awesome page that has 100 ways!...way more than me.  So I'll leave you to fill in the blanks :)

24.
25.
26.
27.
28.
29.
30.
31.

What are some of YOUR tips for being kind?

-Megan

P.S. I'd like to give a shout out to my little sister Melanie for planting the idea of "spreading kindness" in my mind! Love you precious baby sister.


How I Spent My Sweetest Day....

Tuesday, October 25, 2011

with my sweetest person, my husband :)

Remember that post that I talked about baking something sweet? (Here, if you don't remember) Well....I actually didn't make anything that tasted sweet but we made a sweet (as in awesome) pizza!

We kinda have an obsession with making pizza. It all started when we were dating. We wanted to make dinner together one night and I happened to have this box of pizza crust mix in my pantry....we were hooked!


This is the very first pizza we made together...we were so precious that we made it into a heart, haha.
Super back in the daaaay.


On to the present....so I thought it would be nice to make a pizza together. It was also because I was reading this awesome blog called Life Blessons that had some pretty good pizza how-to's on the dough, sauce, and seasonings.

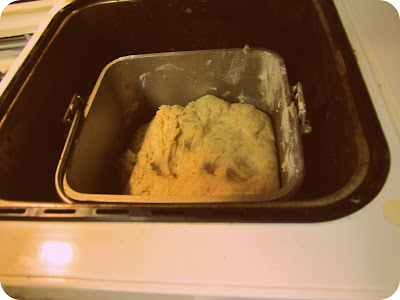
First, we had to make the dough. The recipe on Life Blessons called for a bread maker and I got really sad because I thought we didn't have one....then! My husband reminded me that we did in fact have a bread maker and it was like Christmas morning for me! :)


We followed the directions on here. We changed around the ingredients a little bit though. 

We used:
- 2 c. white flour 
- 1 c. wheat flour
- a good heaping scoop of wheat bran (it's REAL healthy)

and then we followed the rest of the ingredients/ directions for the bread maker. It took about 45 minutes for the dough to rise.

Next, the husband formed the dough into the pizza crust. He's pretty much a pro because he worked in a pizza shop for a long time. 


After the crust was formed, we set the oven to 350 degrees and got the sauce and toppings ready. We used the sauce recipe from Life Blessons as well...and let me tell you, this sauce is the best sauce in the ENTIRE world. I could eat it plain. I am not joking either. 


For our toppings we chose garlic chicken, Parmesan cheese, cheddar cheese, feta cheese and olives. Kinda random but we were just grabbing what was in our pantry. 


We baked it until the crust was golden brown and it was super tasty! We actually ate the whole pizza for dinner :)


It had been long a day for both of us if you can't tell from our tired faces, but the pizza quickly restored our energy. It was an excellent choice for our date night :)

What toppings would you use?

-Megan 

Journal Making Tutorial

Tuesday, October 18, 2011

I really enjoying making journals. There are kinda my specialty. I got started making them when I went home to visit my mom and began making some on her sewing machine. Then I came back to California...without a sewing machine. Therefore, I had to learn to make them by hand. It sounds difficult, but after researching binding techniques and tools on the internet, I came up with an easy way to make them. I thought I'd share, so here you go :)

SUPPLIES NEEDED


-good-sized piece of cardboard...I use old cereal boxes that I store in this mess!


-Two kinds of fabric, one for the outside cover and one for the inside cover
-Hemp thread 
-One button
-Paper to fill the inside of the journal (about 20 sheets)


-Heat Bond


-Awl
-Tapestry Needle
-Beeswax for threading
-Handy Dandy Iron


THE STEPS 

1. First you'll need to decide what kind of notebook you want to make, I made this one as a flip book style. 


2. I have little notepads that I bought to fill journals so I just tear about 20 sheets out. 

3. Using the paper as a guide I measure the cardboard so that there is a small boarder around the paper and enough for a front and back cover. (I'm not really into exact measurements..so sorry if this is irking to you!)


4. Measure the cover fabric using the cardboard you cut out. Leave a half inch border around the cardboard.


5. Cut out a piece of Wonder Under the same size and your cover fabric.

6. Place the backside of the fabric and the rough side of the Heat Bond together.


7.Then iron (with the hottest setting and no steam) with the smooth side of the Heat Bond facing up (as pictured above). 

8. Once it has cooled a little bit, peel off the Heat Bond, make sure that the clear adhesive from it is sticking to the fabric.


9. Next, Iron the Fabric to the cardboard sticky side down.


10. Once cooled, flip it over and iron down the edges to the other side of the cardboard.


11. To keep the fabric from looking bulky at the corners, snip away a little square so that it can be ironed down smoothly.


12. Now, take the second piece of fabric for the inside cover and cut it slightly smaller than the cardboard so that the pattern fabric will show.


13. Then cut a piece of Heat Bond to fit the fabric and repeat steps 6-8.


14. Iron it on.


Here's what it should look like so far:


Inside


Outside 


Continuing On....

15. Next we need to attach the paper, so place it where you'd like it inside the cover.


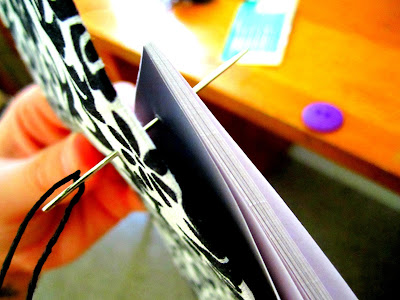
16. Hold the paper and cover tightly together, while piercing two holes through the paper and cover.


17. Make the holes a little bigger by working the awl into the paper and the fabric separately.

18. Next, take a long strand of hemp thread and work the beeswax into the end to make it easier to thread the tapestry needle.


19. Thread the tapestry needle.

20. Now you can bind the paper and the cover together by weaving in and out of the two holes.


21. Finish by tying a bow on the paper side to secure it. (unfortunately I forgot to take a picture of it with this journal but here is one from another journal I've made). 


22. Next, you'll attach the button to the front of the journal. 

23.Place the button where you want it, use the awl to poke holes where the button holes are.


24. Once again, use the beeswax to help thread the tapestry needle and sew the button on. 


25. Take the awl and piece a hole in the back cover of the journal and thread a long piece of hemp through to wrap around the button for closure.


26. Tie a knot on each side to secure the hemp.


27. Knot the end of the hemp as well.


28. FINALLY...wrap the hemp around the button to close the journal. 

Ta-Da! 


I'm not sure why it loaded upside down, but I can't fix it :/

29. The very last step...put a lot of heavy things on top of the journal to make it lay flat and let it set for a couple of hours.


...It's somewhere under there!

I hope that this helps you on your crafting endeavors! Please let me know any improvements I could make or if you have questions on any step.

Happy Crafting!

-Megan


First Project with my Sewing Machine!

I am really excited because I finally got a sewing machine! My mom gave me her old Singer and now all my crafting dreams can come true!

My very first project with my sewing machine was to try this t-shirt revamp with an old t-shirt and tie. I found it on Pinterest, of course. I finished it yesterday and I decided to wear my newly revamped t-shirt today.


So cute huh?! It was super easy and quick to make. It took me about 10 minutes. The tutorial is at McKell's Closet...check it out :) 

I love making old things new! 

-Megan 

CopyRight © | Theme Designed By Hello Manhattan